Pages

Friday, August 9, 2013

Vocabulary Match Game

I've used this game twice in my field experience classroom and both times I was worked fairly well.  I made a few changes the second time [and still may continue to make more] but still plan on using this game in the future.  Both times I have used this game with my students I called it something different.  The first time it was Triangluar Vocabulary Memory and the second time it was just Line and Angle Vocabulary.  In the future I think I am just going to call it the Vocabulary Math Game or Vocab Matching. [Any ideas?] This way it's less work when I go to great worksheets and playing cards.  I also feel like my students will know that the same will involve new vocabulary words each time it is played.

I doubt I'm the first person to every come up with this "game" but this was my thought process:
I currently work with students in an Alternative School program.  I work with a range of students from Freshman to Senior year.  Some students are behind one grade level, some more than that.  My main propose when working with these students to help prepare them for the EOC (I don't have them every day so I am only give certain areas to focus on).  In order to teach any unit to these students I always had to start with the vocabulary to ensure all student knew the words and the correct definitions.  We (the other students I co-teach with and myself) were struggling to do this in a way to keep all students involved.  No matter what we did we always seemed to lose a group of students.  Sometime the more advanced students, sometimes the least advanced students...either way we need a change and I thought of this solution. 


This "game" is played just like the childhood game of memory with a few minor changes.  Instead of trying to match a pair of pictures the object is to match a card that has a vocabulary word and it's definition to a card that has a picture representing the word.  Students play in pairs (or groups of three) taking turns flipping over two cards at a time in search of a match.
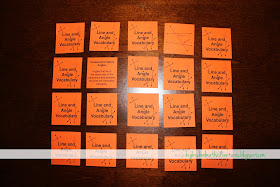
Vocabulary Match Game - Line and Angle Edition
This picture shows a match (R2C2 & R1C4).
Once students find a match everybody in that pair (or group) fills in the worksheet with the definition. 

Worksheet that goes with Vocabulary Match Game
This picture shows a complete student worksheet.
(Sorry I couldn't fgure out how to turn it, it kept uploading sideways)


They way that I designed the "game" and worksheet is so that the pictures don't appear on the playing cards with the word.  So students don't just match words for words and not even take notice to the picture or definition.   But, the pictures show up with the words on the worksheet.  This way if the students need help to figure out what a picture is, they have somewhere to look, but they still are being forced to look at the picture.  I also wanted the worksheet as a way to force them the have to write down the definition to only further help the students save the information in their brains. 


Below is a picture of both sets of my cards.  I printed them on color paper (of different colors) because it easier to handout and store all together this way. I don't recommend printing on white or yellow, I only did it once, because they are see through and the students were just looking through the paper to find what they were looking for instead of actually playing the game.  I also tried to fill up the back of the cards to help insure students couldn't just look through the paper.


Here are my two PDF files for both versions I have. I believe the Triangle one has a typo on it, but couldn't find my original to make the changes. So when I find the original I will update and post.
Line and Angle Vocabulary
Triangular Vocabulary

As always leave a comment with any thoughts or questions and and feed back if you use this (or something similar) in your classroom.

Tuesday, August 6, 2013

Tip & Trick Tuesday: Unit Circle Hand Trick

I first learned his nifty little trick to help remember the unit circle last year when I was observing in a classroom at a local high school as part of my degree requirement.  This wasn't something that the teacher taught, but actually something one of the students shared with her classmates (I am unsure where she learned it).  I have also seen it floating around Pinterest, but I wanted to share my version because it can easily be adapted for both left-handed and right-handed people.

Note: This trick was designed only to help remember the  first quadrant of the unit circle but I will show you my own little trick to applying it to all of the unit circle.

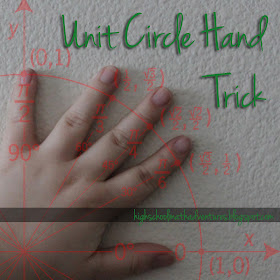
Unit Circle Hand Trick

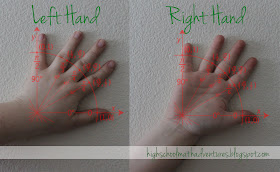
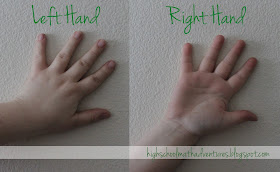
For this 'trick' to be most effective students should use their glove hand (you know, the hand your glove goes on in baseball/softball; the left for those who are right-handed, and the right for those who are left-handed).  The below pictures shows how to hold your hands.

How to hold your hands

Each one of your five fingers represents a  special points on the Unit Circle:
Thumb - 0° or 0π (2π)
Index Finger - 30° or π/6
Middle Finger - 45° or π/4
Ring Finger - 60° or π/3
Pinky Finger - 90° or π/2

Each finger represents a special point on the unit circle.


Finding Sine and Cosine: First Quadrant

When finding sine and cosine remember your answer always looks like the square root of something over two (√?/2).

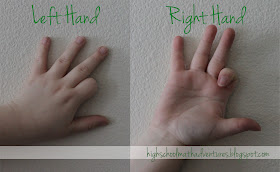
Step one: To find the value for sine/cosine just fold down the respective finger.  For example, if we wanted to find sine/cosine values for 30° or π/6 we would fold down the index finger.

Example: folding index finger down.

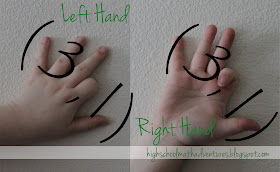
Step two: Now we turn our hands into an ordered pair; parentheses on the outside and a comma where the folded down finger is.
How to turn your fingers into an ordered pair.

So continuing with our example of 30° or π/6 we get (3,1).

Step three: We must now implement what was stated before step one (√?/2), which gives us (√3/2, √1/).  This simplifies to (√3/2, 1/2).

Step four: Since we know on the unit circle, the ordered pairs are presented (cosine, sine) we can conclude that the sin(30°) or sin(π/6) is equal to 1/2 and the cos(30°) or cos(π/6) is equal to √3/2.

Note:  This does work for 0° and 90°.  0/2=0 and √4/2=2/2=1.

Finding Sine and Cosine: Second Quadrant

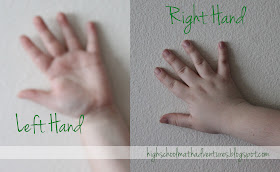
This is almost as easy as the process for Quadrant I, but with a few small changes.  First things, first, we need to flip our hands (just like a reflection over the y-axis).  Now each finger represents a new point on the unit circle:
Pinky Finger: 90° or π/2
Ring Finger: 120° or 2π/3
Middle Finger: 135° or 3π/4
Index Finger: 150° or 5π/6
Thumb: 180° or π

New position for hands.

Now we follow steps one through three for  Finding Sine and Cosine: First Quadrant.
For example, if we were trying to find the sine/cosine values of 120° or 2π/3 we would get (√3/2, 1/2).

Step four: Since we flipped our hands over the y-axis, we now must switch our values in our ordered pair.
Thus we now have (1/2, √3/2).

Step Five: Finally we must apply negative signs where appropriate for the second quadrant (the x-value of the order pair).
Therefore we end up with (-1/2, √3/2) and can conclude that sin(120°) or sin(2π/3) is equal to -1/2 and cos(120°) or cos(2π/3) is equal to √3/2.


Finding Sine and Cosine: Third Quadrant

This is exactly the same as Finding Sine and Cosine: Second Quadrant, except for step five, we now negate both value of the ordered pair.  (You also have to reflective your hand again, this time over the x-axis.  Or starting from the original position, rotate 180° counter clockwise.  This is an awkward position for the right handed people.  Fingers will also now represent new positions on the unit circle.)

Finding Sine and Cosine: Fourth Quadrant

Starting from the original position, flip your hand down (reflect over the x-axis).  Fingers will also now represent new positions on the unit circle. (This is an awkward position for the left handed people)

Follow steps one through three for  Finding Sine and Cosine: First Quadrant.

Step four: Apply negative signs where appropriate for the fourth quadrant (the y-value of the order pair).


Finding Tangent:

Follow step one and two for Finding Sine and Cosine: First Quadrant.   Going back to our example of 30° or π/6 we get (3,1).  

Step three: Rotate your ordered pair 90° counter clockwise and turn into a fraction.

Step four: Place fraction under radical sign and simplify.


Step five: Now we can conclude that tan(30°) or tan(π/6) is equal to √3/3.


Congratulations if you made it to the bottom of this post.  I hope that this all made sense to you.  If not, please ask questions, I'm more than happy to help you understand. 
If you use this in your classroom, please leave a comment below; I am curious as to how your students will react.

Friday, August 2, 2013

Pythagorean Theorem Board Game

This fun board game is a great way to to have student actively practice using the Pythagorean Theorem.


The rules are printed right on to the game board so each group of student always have the rules in case they need to reference them throughout the game.  I changed the rules a bit from the picture above.  In the PDF version below the procedure changes slightly when you go around the board the second time.  The first time around students practice solving the Pythagorean Theorem for the hypotenuse, while the second time around they are practicing solving for a leg. 

When I did this with my students, I had them work in groups of three.  We played this for the last 35 minutes of class.  I had one group finish right away and I just had them play again, but for the rest of the groups it seemed to be the perfect amount of time.  [If you use this as a review or your students have a good grasp of the PT, then I would have them go around the board again.  Or maybe think of an extra twist of your own?]

Next time:  Since I changed the rules a little, there isn't a lot that I plan on changing for next time I use this.  There are a few comments I will make; 1) the purple spaces are part of the board.  For some reason, I had a lot of students who thought they weren't playable spaces.  2) the pink triangles on the board are just decoration, they don't mean anything. These confused a lot of students at first, but the board just seemed too plain without them. Another change I made in the direction that I will implement next time is how students show their work.  Last time I had them use a worksheet, but it didn't really work and I think just having them do something like the below picture will work just fine.


Question Cards: I really like the questions cards because they allow students to see how problems might be presented in a stressful situation (Test/Quiz). I printed out an extra copy of the sheet that has all the questions cards on it and wrote the answers on them but did not cut it up.  I was walking around the class room with it just in case I needed to help my students.  But I only told them if they were correct or not as a last resort.  I had the other player in the group also solve the question card to make sure the player who drew the card got it correct.  Most students were okay with also doing it so they could make sure the player who drew the card actually got to roll again.  

What you need to use this in your classroom:
• Two Dice for each group of students
• PDF Pythagorean Board Game
  I included a blank page of squares so that you can make your own questions cards if you want.

Make sure to leave a comment if you use this in your classroom.  I would love to hear your thoughts and results!